certbot通过Cloudflare-api验证申请ssl证书
certbot 官网:
https://eff-certbot.readthedocs.io/
certbot 中文官网:
https://certbot.openssl.ac.cn/
Github:
https://github.com/certbot/certbot
Website:
https://certbot.eff.org/
通过certbot请申证书非常方便。
但证书有效通期常不长,以Let’s encrypt的证为书例,每90天需要续期更新。certbot认默通过http方式续期认证,好处在非于常方便,但需要对放外开80端口。对于使不用80端口的服务器以可通过名域服务商api的DNS认证。这样可以关闭80端口的访问。
以托管到Cloudflare域的名为例。
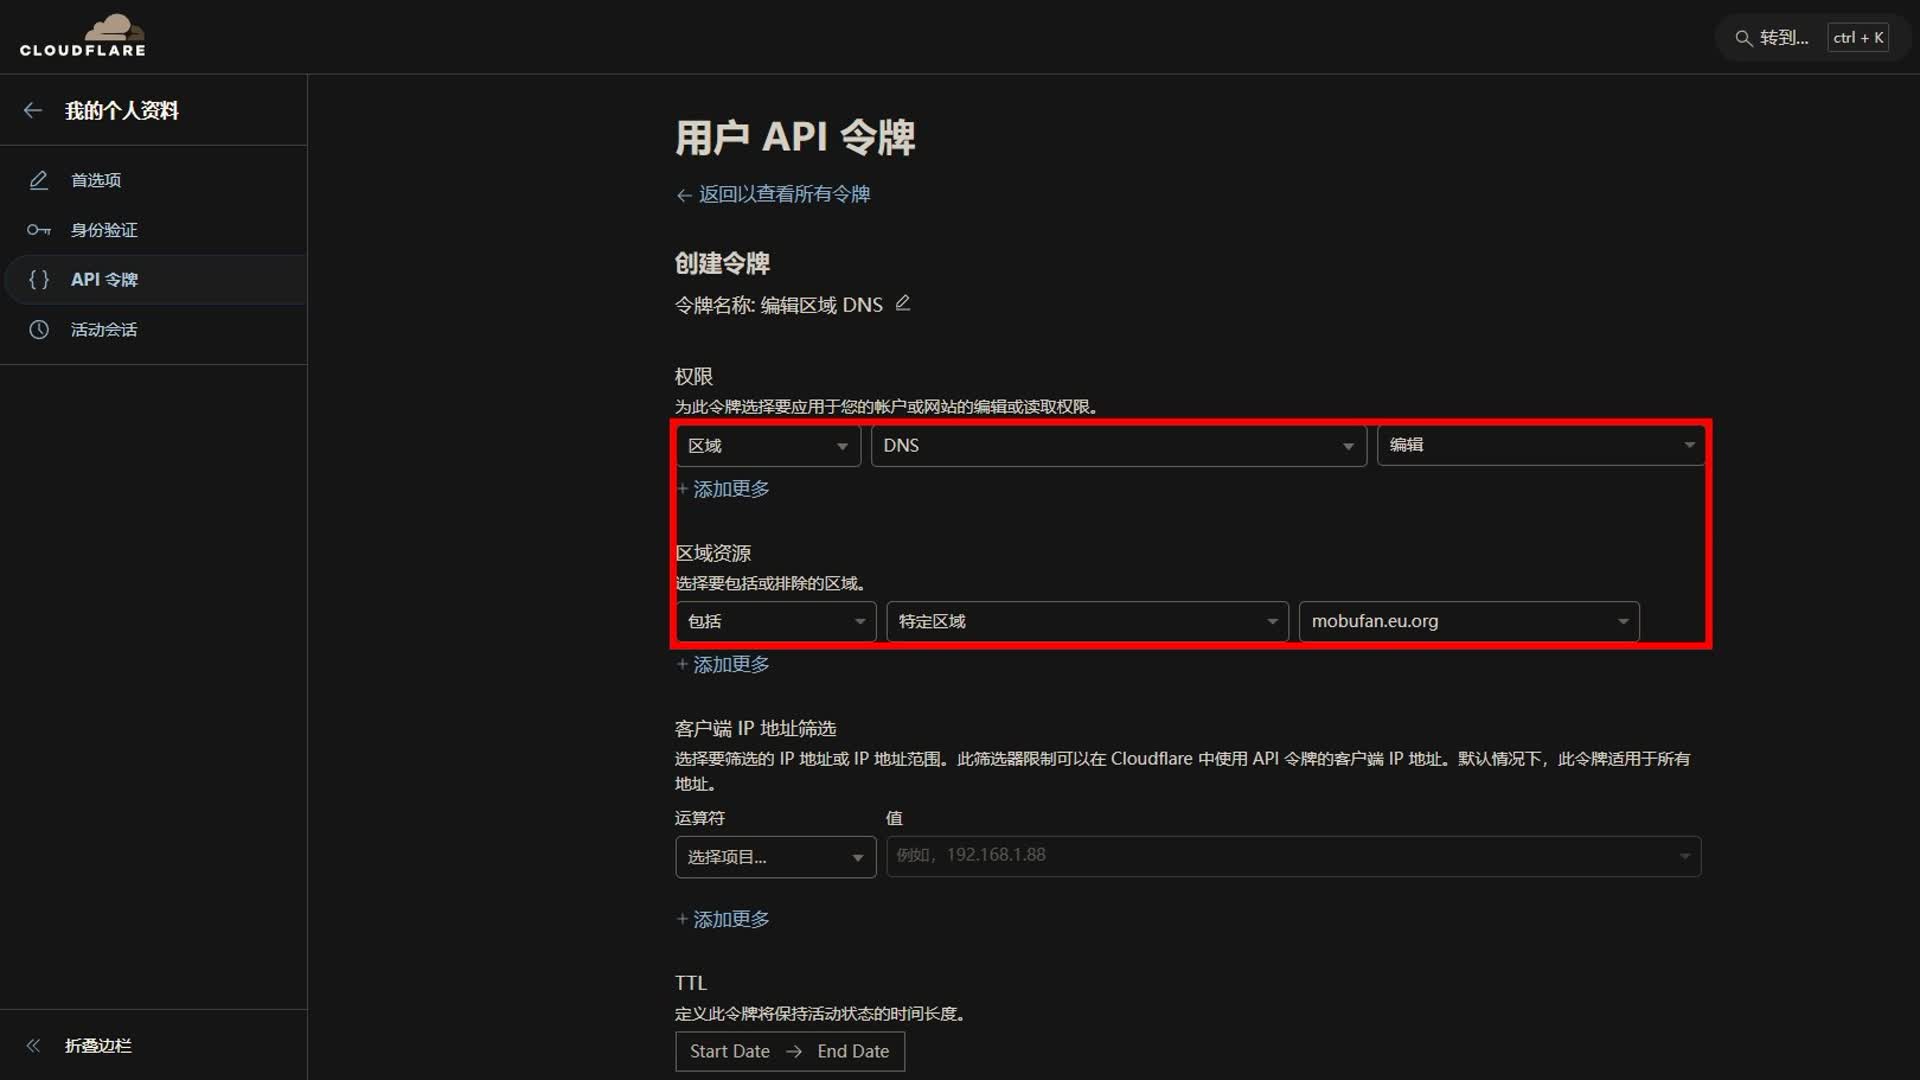
首先创建api token,在Cloudflare profile下点击api token,创建api token。选择DNS管理模板。允编许辑DNS zone,设置管的理域名范围为全或部特定域名。设置允访许问的IP地址,默是认无限制。最后击点创建,保存token。注意及时保存下来,之后再也法无查看这个token。
一 、服器务端安装certbot,和dns-cloudflare插件
1
|
sudo apt update && sudo apt install certbot python3-certbot-dns-cloudflare -y
|
二 、创建验证dns置配文件
1 、获取cloudflare_api_token
cloudflare官网:
https://dash.cloudflare.com/
2 、创建用于验证dns的配置文件
如有果多个域名对应不于同token可以设不置同的配置文件。
使用受限 API 令牌的示例凭证文件(推荐):(指定为哪个域名而生成的key)
dns_cloudflare_api_token = 0123456789abcdef0123456789abcdef01234567
使用全局 API 密钥的示例凭证文件(不推荐):
dns_cloudflare_email = cloudflare@example.com
dns_cloudflare_api_key = 0123456789abcdef0123456789abcdef01234
1
2
3
4
5
6
|
mkdir -p /etc/letsencrypt && touch /etc/letsencrypt/domain_name.ini && cat > /etc/letsencrypt/domain_name.ini <<'EOF'
dns_cloudflare_api_token = ZFxP-pxzlzeOb7Y9MFsildH1xgGEit46_NEizPUC
EOF
## 配置完成改修配置文件权限
chmod 600 /etc/letsencrypt/domain_name.ini
|
- 这里是个大坑。网上的教程和询问AI都不会告你诉当采用scoped API token里这必须只配置token,不配能置
dns_cloudflare_api_key和dns_cloudflare_email
三 、申请证书
1 、运行certbot把认证方切式换到api认证
1
2
3
4
5
6
|
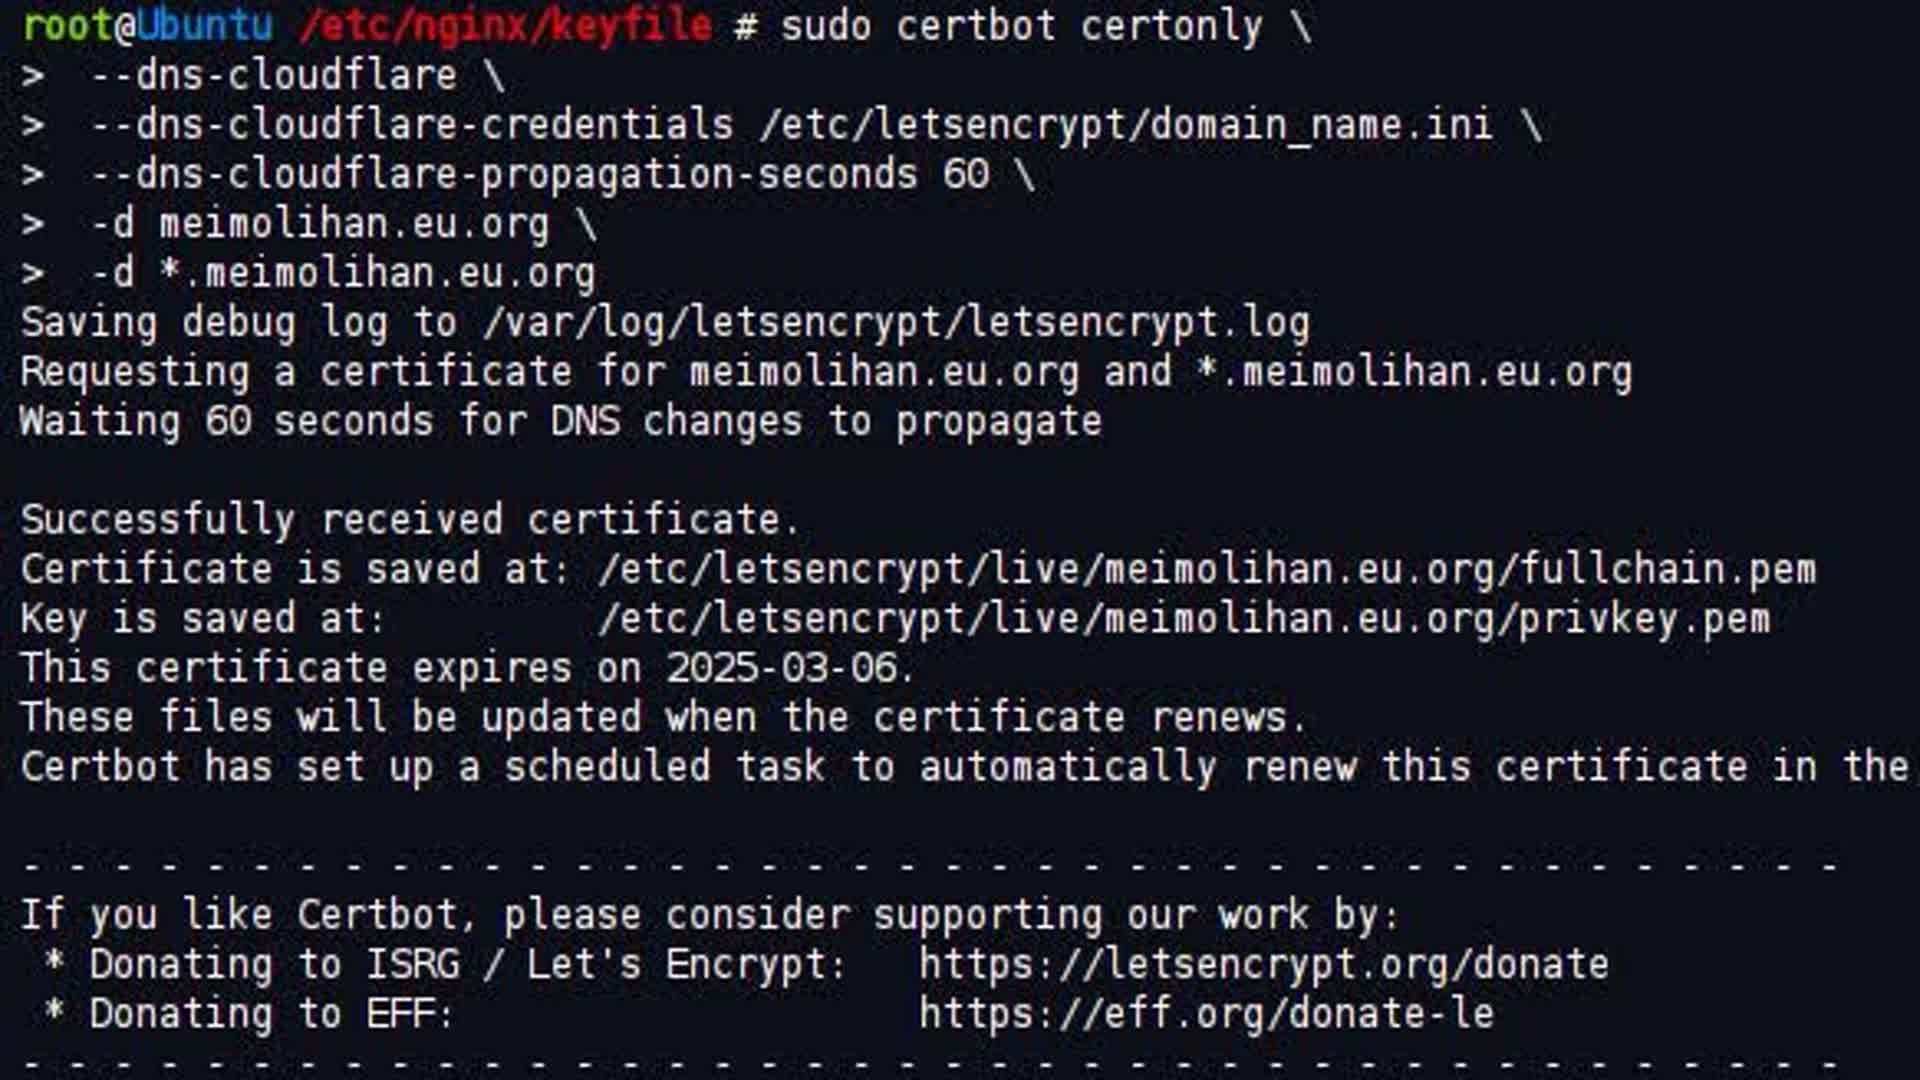
sudo certbot certonly \
 --dns-cloudflare \
 --dns-cloudflare-credentials /etc/letsencrypt/domain_name.ini \
 --dns-cloudflare-propagation-seconds 60 \
 -d example.com \
 -d *.example.com
|
此处的/etc/letsencrypt/domain_name.ini配置文件路径,要和上面的一致。
2 、第一次需要输入邮箱(用于过期提醒)
3 、将证书文件拷贝到 nginx 证书目录
1
|
cp /etc/letsencrypt/live/example.com/fullchain.pem /etc/nginx/keyfile/cert.pem && cp /etc/letsencrypt/live/example.com/privkey.pem /etc/nginx/keyfile/key.pem
|
这样的话,证申书请就大功告成了,每次证书期到后也会自动续期(当然是在API令牌过之期前),可谓省心省力。API令牌过的期话只需要修改cloudflare.ini文件,然后重运新行这命个令就好。
四 、certbot 维护命令
1 、certbot 查看证书详情
2 、certbot 模拟续签证书
1
|
sudo certbot renew --dry-run
|
- 没有报错说明 certbot renew 可以成功续签证书
3 、certbot 续签所有证书
4 、强制续签所有配置的证书
1
|
certbot renew --force-renewal
|
5 、撤销某个证书
1
2
|
certbot revoke --cert /etc/letsencrypt/live/mobufan.eu.org/fullchain.pem
certbot revoke --cert /etc/letsencrypt/live/mobufan.eu.org/privkey.pem
|
6 、查看证书目录
1
|
ls /etc/letsencrypt/live/
|
7 、查看日志文件,最后几行
1
|
sudo tail -n 100 /var/log/letsencrypt/letsencrypt.log
|
- 上面的命令会显示日志文件的最后 100 行。您可以根据需要调整 -n 参数后面的数字来查看更多或更少的行。
8 、查看证书的有效期信息
1
|
openssl x509 -in /etc/letsencrypt/live/mobufan.eu.org/fullchain.pem -noout -dates
|
- 这条命令是使用
openssl 工具查看 /etc/letsencrypt/live/mobufan.eu.org/fullchain.pem 这个 X.509 证书的有效期信息。
五 、certbot 证书自动续签
1 、certbot 添加自动续签 Linux 计划任务(命令方式)
1
2
3
4
5
|
## 每周日01:05,certbot 自动续签 mobufan.eu.org 证书(命令方式)
05 1 * * 0 date >> /var/log/certbot-renew.log && certbot renew --renew-hook 'sudo systemctl restart nginx' >> /var/log/certbot-renew.log
## 每周日01:35,certbot 续签的 mobufan.eu.org 证书同步到 nginx证书目录
35 1 * * * cp /etc/letsencrypt/live/mobufan.eu.org/fullchain.pem /etc/nginx/keyfile/cert.pem && cp /etc/letsencrypt/live/mobufan.eu.org/privkey.pem /etc/nginx/keyfile/key.pem
|
每周日(0 代表周日,按照 cron 语法中间时设定左从到右次依是分钟、小时、日、月、周几)的0点0分执行以下操作
首先,将系统当前日信期息追加(» 表示追加)写入到 /var/log/certbot-renew.log 日志文件中
然后执行 certbot renew –quiet 命令尝来试更新证书,并且将个这证书新更操作的输出信也息追加到 /var/log/certbot-renew.log 日志文件里
Certbot支持三种钩子,可以过通选项附加在certbot renew的末尾。
–pre-hook:更新证之书前调用
–post-hook:更证新书之后调用
–deploy-hook:目的是确保在证书部署完成后,整个系统能够正确地使用新证书并且维持良好的运行状态。这可能涉及到对系统整体的检查、验证或者与其他组件的协调。
–renew-hook :主要目的是与证书更新后的即时操作相关,特别是与服务的更新关联。通常用于确保依赖证书的服务(如 Web 服务器)能够及时加载新的证书并继续提供服务。
2 、certbot 添加自动续签 Linux 计划任务(脚本方式)
1. 创建脚本
 1
 2
 3
 4
 5
 6
 7
 8
 9
10
11
12
13
14
15
16
17
18
19
20
21
22
23
24
25
26
27
28
29
30
31
32
33
34
35
36
37
38
39
40
41
42
43
44
45
46
47
48
49
50
51
52
53
54
55
56
57
58
59
60
61
62
63
64
65
66
67
68
69
70
71
72
73
74
|
mkdir -p /mnt/my-sh/ssl && touch /mnt/my-sh/ssl/certbot-mobufan.eu.org.sh && chmod +x /mnt/my-sh/ssl/certbot-mobufan.eu.org.sh && cat > /mnt/my-sh/ssl/certbot-mobufan.eu.org.sh <<'EOF'
# 定义证书存储目录
certs_directory="/etc/letsencrypt/live/"

days_before_expiry=5  # 设置在证书到期前几天触发续签

# 遍历所有证书文件
for cert_dir in $certs_directory*; do
    # 获取域名
    domain=$(basename "$cert_dir")

    # 忽略 README 目录
    if [ "$domain" = "README" ]; then
        continue
    fi

    # 输出正在检查的证书信息
    echo "检查证书过期日期: ${domain}"

    # 获取fullchain.pem文件路径
    cert_file="${cert_dir}/fullchain.pem"

    # 获取证书过期日期
    expiration_date=$(openssl x509 -enddate -noout -in "${cert_file}" | cut -d "=" -f 2-)

    # 输出证书过期日期
    echo "过期日期: ${expiration_date}"

    # 将日期转换为时间戳
    expiration_timestamp=$(date -d "${expiration_date}" +%s)
    current_timestamp=$(date +%s)

    # 计算距离过期还有几天
    days_until_expiry=$(( ($expiration_timestamp - $current_timestamp) / 86400 ))

    # 检查是否需要续签(在满足续签条件的情况下)
    if [ $days_until_expiry -le $days_before_expiry ]; then
        echo "证书将在${days_before_expiry}天内过期,正在进行自动续签。"

        # 停止 Nginx
        systemctl stop nginx

        iptables -P INPUT ACCEPT
        iptables -P FORWARD ACCEPT
        iptables -P OUTPUT ACCEPT
        iptables -F

        ip6tables -P INPUT ACCEPT
        ip6tables -P FORWARD ACCEPT
        ip6tables -P OUTPUT ACCEPT
        ip6tables -F

        # 续签证书
        certbot certonly --standalone -d $domain --email 496338740@qq.com --agree-tos --no-eff-email --force-renewal

        # 同步证书到 nginx
        cp /etc/letsencrypt/live/mobufan.eu.org/fullchain.pem /etc/nginx/keyfile/cert.pem && cp /etc/letsencrypt/live/mobufan.eu.org/privkey.pem /etc/nginx/keyfile/key.pem

        # 启动 Nginx
        systemctl restart nginx

        echo "证书已成功续签。"
    else
        # 若未满足续签条件,则输出证书仍然有效
        echo "证书仍然有效,距离过期还有 ${days_until_expiry} 天。"
    fi

    # 输出分隔线
    echo "--------------------------"
done
EOF

## 立即执行命令
/mnt/my-sh/ssl/certbot-mobufan.eu.org.sh
|
使用 Certbot 工具续签证书。
–standalone 表示使用独立的 HTTP 服务器进行验证,
-d $domain 指定域名,
–email 指定联系邮箱,
–agree-tos 表示同意服务条款,
–no-eff-email 表示不希望收到 EFF 的邮件,
–force-renewal 强制续签。
2. 添加 Linux 计划任务
1
2
3
4
5
|
## 每日01:25,certbot 自动续签 mobufan.eu.org 证书(脚本方式)
25 1 * * * /mnt/my-sh/ssl/certbot-mobufan.eu.org.sh

## 每日01:35,certbot 续签的 mobufan.eu.org 证书同步到 nginx证书目录
35 1 * * * cp /etc/letsencrypt/live/mobufan.eu.org/fullchain.pem /etc/nginx/keyfile/cert.pem && cp /etc/letsencrypt/live/mobufan.eu.org/privkey.pem /etc/nginx/keyfile/key.pem
|
六 、完全卸载 certbot 和 python3-certbot-dns-cloudflare
1 、删除 Certbot:
2 、手动删除 Certbot 文件
1
|
sudo rm -rf /etc/letsencrypt/ && sudo rm -rf /var/lib/letsencrypt/ && sudo rm -rf /var/log/letsencrypt/
|
3 、更新仓库并自动清理
1
|
sudo apt update && sudo apt upgrade && sudo apt autoremove
|
4 、卸载 certbot 和 python3-certbot-dns-cloudflare
1
|
sudo apt remove certbot python3-certbot-dns-cloudflare -y && sudo apt autoremove
|